The Workflow Manager displays your entire Next Gen Zap as a flow diagram. You can use it to build in three ways:
- Describe your workflow in plain language to the AI assistant.
- Write and run TypeScript code in the code editor.
- Make targeted edits on the visual canvas.
Reach the Workflow Manager from the main left sidebar on Zapier. Clicking Automations opens the Zaps page, and Next Gen Zaps in the second sidebar opens a page that lists your Next Gen Zaps. Clicking a workflow on that page opens it in the Workflow Manager, and the + Create button opens the options to create a new workflow or import a classic Zap.
Available on plans:

Free

Professional
Team
Enterprise
 Early Access
Next Gen Zaps is in early access by request. Sign up at https://zapier.com/workflow/early-access. If you’re on a Team plan, the request must come from an account owner or admin. If you’re on an Enterprise plan, contact Support for access. This feature has limited availability and is in active development.
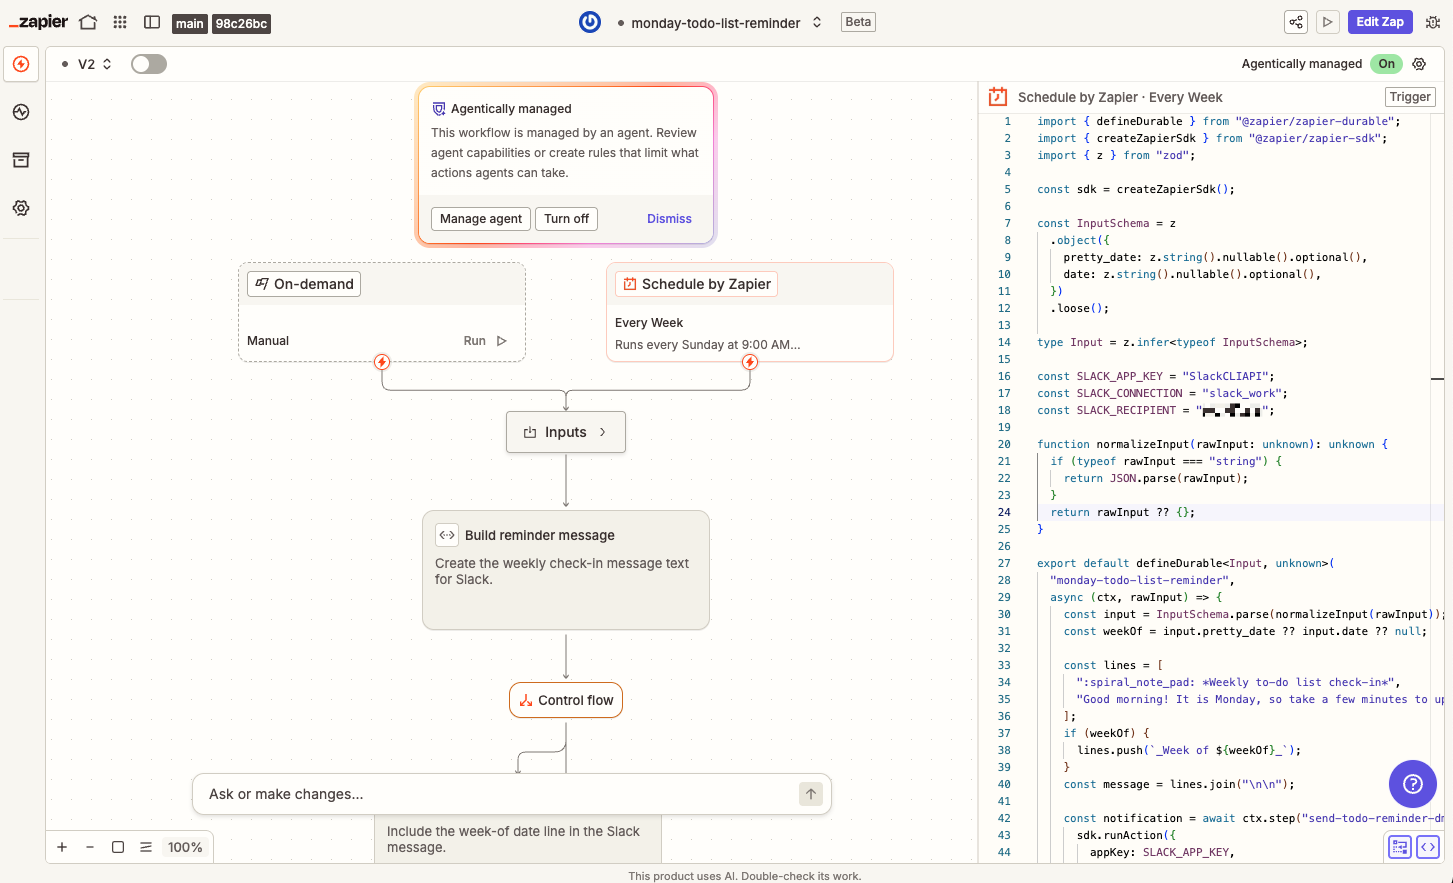
Top menu controls
On the left side of the top menu
- Home button : click to return to the Zapier home page.
- Automation products button : click to open a dropdown menu of the other products you can create on Zapier, along with your current plan. Each product name links to its asset page in a new window, and the plus button beside it creates a new asset of that type.
- AI assistant button : click to open or close the AI assistant sidebar.
 : click to return to the
  : click to open a dropdown menu of the other products you can create on Zapier, along with your current plan. Each product name links to its asset page in a new window, and the plus button beside it creates a new asset of that type.
 : click to open or close the AI assistant sidebar.
In the middle of the top menu
- Your avatar: the avatar you created for your user profile.
-
Workflow name: click to open a dropdown menu that contains:
- A toggle switch that turns the workflow on and off. Its label reports the current state, either Workflow is turned on or Workflow is turned off.
- Rename : changes the name of the workflow.
- Duplicate : creates a copy of the workflow.
- Export : downloads the workflow.
- Delete : deletes the workflow.
 : changes the name of the workflow.
 : creates a copy of the workflow.
 : downloads the workflow.
 : deletes the workflow.
On the right side of the top menu
-
Share button : click to open a dialog box that shares the workflow with a member or team in your account.
- You can only share viewer access. The people you share with can review the workflow but cannot edit it.
- Run button : click to open the test run dialog box.
-
Edit Zap or Publish button: one button that changes with the state of the workflow.
- When you are viewing a published version, clicking it creates a draft and opens it for editing.
- When you are editing a draft, clicking it publishes the draft as a new version.
 : click to open a dialog box that shares the workflow with a member or
  : click to open the test run dialog box.
 Note
NoteA test run executes your workflow against your live app connections. It is not a sandbox, so it performs the action live. The dialog box has an Edit inputs option for changing the values the run uses, and a Test run option for starting the run.
Left sidebar controls
- Build button : the canvas, where you design your workflow.
- Status button : opens a sidebar listing the runs for this workflow. A workflow that has never run displays an empty list.
- Components button : opens the Components page.
- Settings button : opens the Settings page.
 : the canvas, where you design your workflow.
 : opens a sidebar listing the runs for this workflow. A workflow that has never run displays an empty list.
 : opens the Components page.
 : opens the Settings page.
Components
The Components page organizes reusable assets you used in your workflow. Its Connected Accounts tab lists every connected app account the workflow uses, and which steps use it. An Add connection option connects another account.
 Connected Accounts tab lists every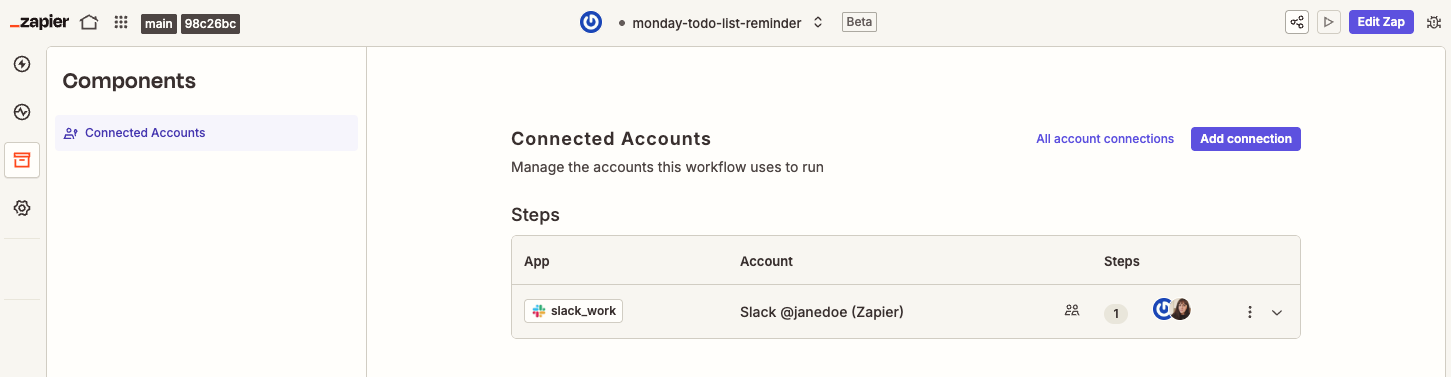
Settings
The Settings page lets you adjust controls for how an agent monitors and changes the workflow.
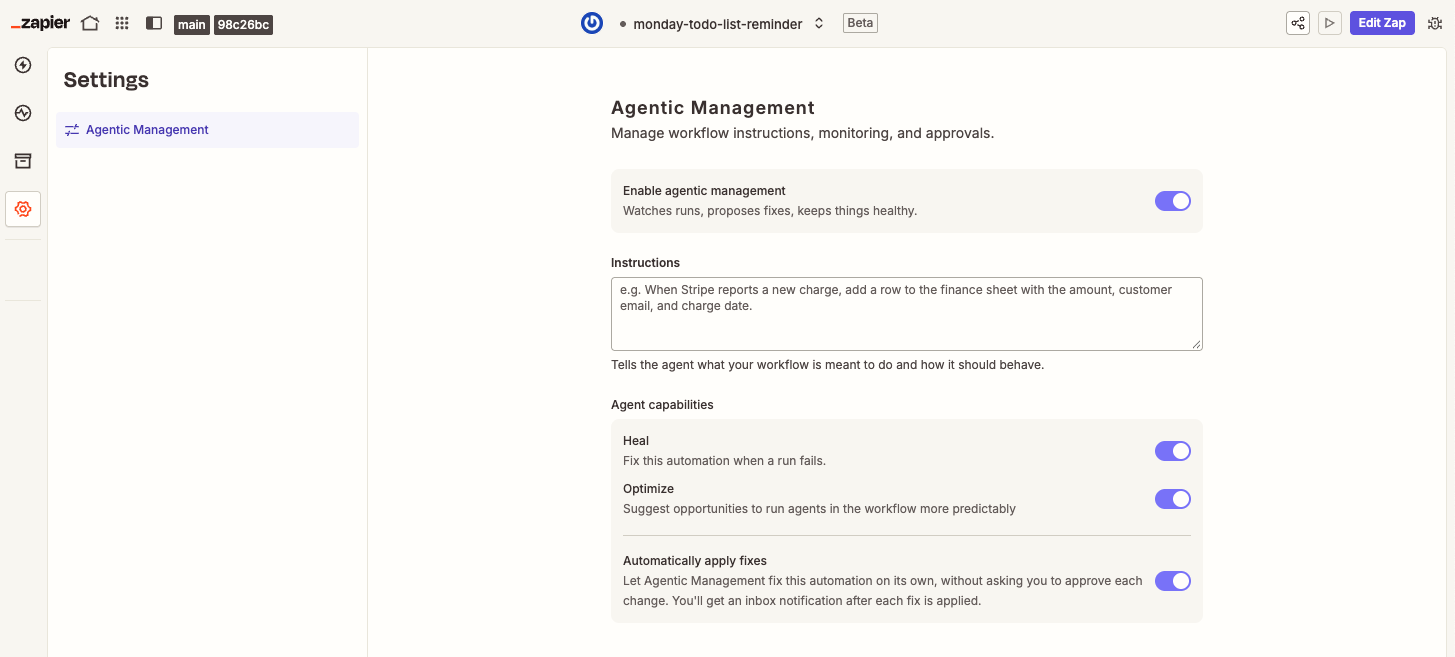
Under Agent behavior:
- Enable agentic management: turn on to let an agent watch runs, propose fixes, and keep the workflow healthy.
- Instructions: describe in plain language what the workflow is meant to do and how it should behave. The agent uses this to judge whether the workflow has drifted from your intent.
-
Agent capabilities:
- Heal: fix the workflow when a run fails.
- Optimize: suggest improvements after successful runs.
- Automatically apply fixes: let the agent apply a fix on its own when the fix does not change what the workflow can do. Zapier emails you after each fix is applied.
Canvas controls
Version and draft selector
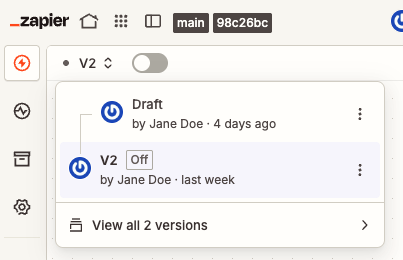
At the top left of the canvas, a dropdown menu reports what you are currently viewing (either a published version such as V2 or a Draft). Next to it, a toggle switch turns the workflow on and off.
The dropdown menu displays your current drafts and the live version. Each entry has a menu button with options to rename it, create a new draft from it, or discard it.
 with options to rename it, create a new draft from it, or discard it.
At the bottom of the menu, View all versions opens the Versions sidebar, which lists every published version of the workflow with its author and publish time. For what you can do there, read Create Next Gen Zap drafts and versions.
Agent indicator
When Agentic Management is turned on, Agentically managed and its current state appear at the top right of the canvas. When published, a card on the canvas repeats this, with these options:
- Manage agent: opens the Agent behavior settings.
- Turn off: turns off Agentic Management for this workflow.
- Dismiss: hides the card. The indicator at the top right remains.
Workflow steps
The center of the canvas displays your workflow as a flow diagram. Unlike a classic Zap, a Next Gen Zap can have more than one trigger, and the diagram displays each of them side by side.
You can select any step in the diagram to review and edit its details. What appears depends on the type of step.
Every workflow also contains an Inputs step between the triggers and the first action. The steps above it define what starts the workflow, and the steps below it read the values they need from Inputs. This is what lets one workflow accept more than one trigger, and it is why a workflow can run with no trigger at all: on a schedule, from the API, by hand, from an AI agent, or when another workflow calls it.
Zoom and layout
At the bottom left of the canvas, there are additional buttons to adjust the layout of the canvas:
- + Zoom in button: focuses your view on a specific part of the canvas.
- - Zoom out button: pulls back your view to display more of the canvas.
- Fit to view button: adjusts your view to surround the entire workflow.
- Reset layout button: returns the steps to their default arrangement.
- Zoom percentage indicator: reports your current zoom level.
 Fit to view button: adjusts your view to surround the entire workflow.
 Reset layout button: returns the steps to their default arrangement.
Visual and code views
At the bottom right of the canvas, two buttons control how the workflow is presented:
- Visual button: the flow diagram of your steps.
- Code button: a code editor containing the workflow as code.
 Visual button: the flow diagram of your steps.
 Code button: a code editor containing the workflow as code.
You can open both views at the same time or each one individually.
Ask or make changes
A prompt box sits at the bottom of the canvas. It accepts a change described in plain language, such as adding a trigger, and a send button submits it. The agent then drafts the change for you without opening any additional dialog boxes or sidebars.
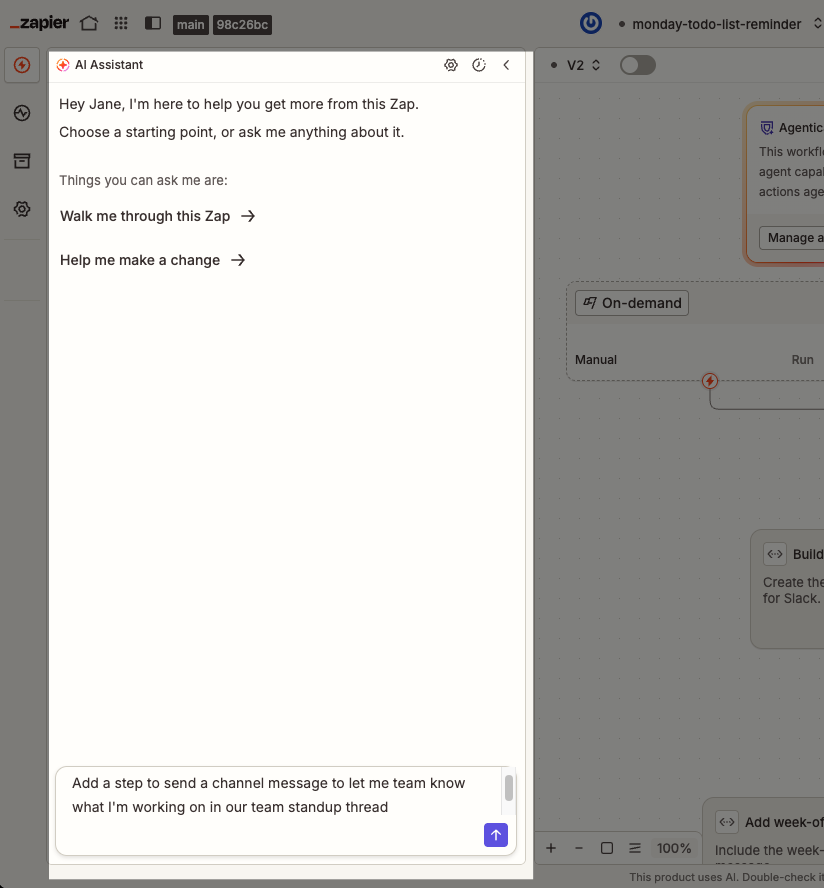
AI assistant
The AI assistant opens in a left sidebar. It builds and changes your workflow from instructions you give in plain language.
The AI assistant button in the top menu opens it as a sidebar to the right of the far left sidebar.
Next steps
- Read Get started with Next Gen Zaps for early access pricing, limitations, and security considerations.
- Read Create Next Gen Zap drafts and versions to publish your changes and review earlier versions.
- Read Agentic Management in Next Gen Zaps for what the Agent behavior settings do.