MCP, or Model Context Protocol, is an open protocol that standardizes how applications provide context to large language models (LLMs). Zapier MCP provides a server endpoint for connecting your Zapier account to an AI client, such as Claude or Cursor.
This article explains how to set up an MCP server with some of the most popular clients. It also covers how to generate and manage connection tokens for clients not on the supported list.
Available on plans:
Free
Professional
Team
Enterprise
Why use MCP with your AI client?
When you use Zapier MCP, you can add Zapier's library of 9,000+ apps to your AI, allowing it to interact with your existing apps and take action in them directly from your AI conversations.
Requirements
To use Zapier MCP with your client, you'll need:
- A Zapier MCP server URL.
- Tools set up for your client.
- An AI client, such as ChatGPT, Claude, or Windsurf that supports Streamable HTTP.
Supported clients
You can connect Zapier MCP with any AI client that supports Streamable HTTP, such as:
- ChatGPT
- Claude (web, Desktop, and Code)
- Cursor
- Microsoft Copilot Studio
- VS Code
- Windsurf
Set up a new MCP server
Each client must have its own Zapier MCP server.
- Go to mcp.zapier.com and click + New MCP Server. A dialog box will open.
-
In the MCP Client dropdown menu, select your client.
- Select Other if your client does not appear on the list.
- In the Name field, enter a name for your server.
- Click Create MCP Server. The dialog box will close.
- In the top menu bar, select the Connect tab. This contains setup instructions specific to your client.
- Follow the instructions for your MCP client.
- Add and manage tools for your server, or import a tool bundle to give your client access to apps.
For known requirements and limitations per client, check client-specific setup notes.
Using unlisted clients
If your AI client is not listed in Zapier MCP:
- Check your client's documentation for MCP support. Look for references to "Model Context Protocol" or "MCP servers."
- Check which transport your client uses. Zapier MCP supports Streamable HTTP.
- When creating your Zapier MCP server, select Other as your client type.
After creating your server, generate a connection token to authenticate your client:
- Select the Connect tab on your server.
- Click Generate token. A dialog will open showing your credentials.
- Copy and store your credentials immediately. This is the only time you can access the token.
- Check I have saved my credentials, then click Close.
If you close the dialog without saving your token, you cannot retrieve it. You will need to rotate your token to generate a new one.
Your credentials include two connection options:
-
Authorization header (Recommended): Add
Authorization: Beareras a header to your client configuration and connect tohttps://mcp.zapier.com/api/v1/connect. - URL with token: Use the full server URL with the token as a query parameter. Copy the full URL from the dialog.
Rotate your connection token
If you are using an unlisted client (Other) and your connection token is exposed or compromised, rotate it to generate a new one and invalidate the old one.
- In the left sidebar of the MCP home, select your server.
- In the top menu bar, select the Connect tab.
- Click the Rotate token button to generate a new token.
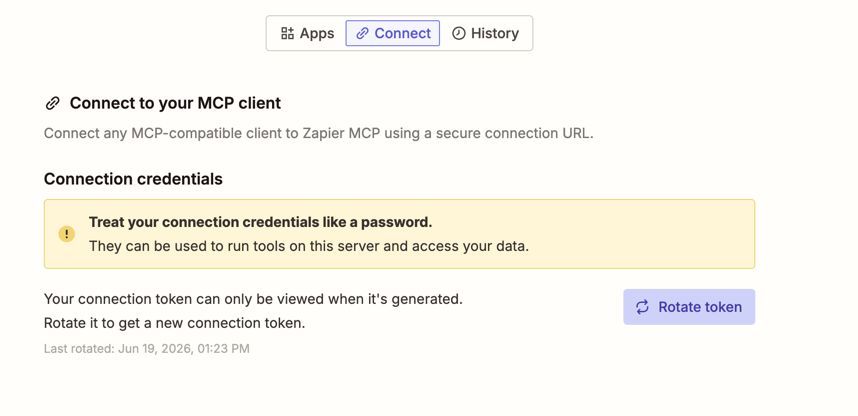
This invalidates your previous token immediately, preventing unauthorized access.
The new token is only visible once, immediately after rotating. Save it before closing the tab. Treat your connection token like a password. Do not share it, as it can be used to run your tools and access your data.
Client-specific setup notes
Some MCP clients have additional requirements or known limitations. Check the section for your client to confirm setup details.
ChatGPT
- MCP tools are only supported in Developer Mode.
-
ChatGPT does not automatically refresh the available tools. If you add, edit, or remove tools in your Zapier ChatGPT MCP server:
- Go to ChatGPT Connector Settings.
- Select the Zapier Connector.
- Click Refresh.
Claude
- To add a new server, you must be the owner of your Claude organization.
- To use Zapier MCP in Claude Desktop, you must first complete the setup available in the Connect tab on Claude.ai.
- Access to add MCP servers on Claude.ai and Claude Desktop is dependent on your Claude plan.
- When running on WSL (Windows Subsystem for Linux), OAuth callbacks from the browser may not reach Claude Code. If authentication does not complete, try running Claude Code from a native Windows or macOS terminal.
- Some versions of Cursor may encounter an RFC 9728 OAuth issue that prevents authentication from completing. Check for client updates if authentication fails repeatedly.
- The Zapier MCP setup instructions reference connecting with an ID field. In Copilot Studio, use the SessionID field, not "AccountID."
- If the setup instructions do not match what appears in Copilot Studio, refer to the latest setup steps on this page.
VS Code
- Requires GitHub Copilot enabled and set to Agent mode in Visual Studio Code.
- Some VS Code extensions may interfere with OAuth flows. Try disabling extensions if authentication fails.
- Some versions of Windsurf may encounter an RFC 9728 OAuth issue that prevents authentication from completing. Check for client updates if authentication fails repeatedly.
Review your server's history
The History tab displays a list of all actions taken through the client for that server. Click an action to review details such as:
- Date and time when the action happened.
- The tool name.
- Instructions used by the AI.
- The values used in each field.
- The final output of the action.
Use the filter dropdown menu to display only actions related to a specific tool.
Delete an MCP server
To delete a server:
- From the Zapier MCP home, hover over your server name.
- Click the Delete MCP server icon . A dialog box will open.
- Confirm the action by clicking Delete.
- When you delete an MCP server, it will stop working on any MCP client connected to that server.
- All the server logs will also be deleted. Tool calls consumed for a deleted server will still count toward your quota.
Zapier MCP task usage
Each successful tool call through your MCP server consumes two tasks from your Zapier plan. Failed tool calls do not consume tasks. Learn more about how Zapier MCP usage works.