Zapier Tables is a data storage solution built for automation. Tables are composed of:
- Records (each row in a table).
- Fields (each column in a table).
- Cells (the area in the intersection of a record and a field).
You can add records manually or automatically using Zaps.
Available on plans:
Free
Professional
Team
Enterprise
Create a new table
You can create a new table from the Tables home:
- Click Create.
- Type a name for the table.
- Click Create table. From this menu, you can:
- Click Import data to import records from a CSV file.
- Select a template to start with a table ready to be automated.
- Click Blank table to create an empty table. Give your table a name and description.
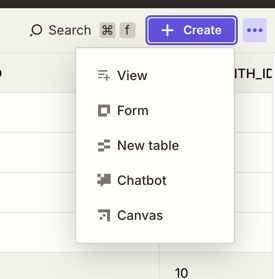
Create a new table from the table screen
You can also create a new table while working on an existing table.
- From your table, click Create.
-
Select New table.

- Enter a name for the new table in the field Table Name.
- Click Create.
Add new fields
When you create a blank table, it will have some text fields set up. To add new fields:
- Click Add field on the right side of a table.
- Select a field type. A sidebar will open.
- Type a name for the field and fill out other required information.
Zapier Tables offer fields that automatically format data, or work with Zaps. Learn more about the different field types in tables.
Edit a field
To edit an existing field:
- In any table, click the field name.
- Select Edit field from the dropdown menu. The sidebar will open, and you can edit the field settings.
- You can also add a field in any position in a table by clicking the name of an existing field and selecting Insert before or Insert after.
- You can move a field to a different location by clicking its name, holding it, and dragging it to the new position.
After you create a new field, you can also create a Zap to interact with the information in that field. Learn more about triggering and continuing Zaps from records.
Add new records
You can add new blank records by clicking New record at the bottom of a table.
Usage visibility
All users on current plans can view their Zapier Tables record usage. You'll see your account-wide record usage against your plan limits. To view your account's record usage:
- Click the Settings icon on your table's left sidebar. The sidebar will expand.
- Scroll down to the Account Record Usage section to view your current record usage.
Bulk edit records
You can edit records by clicking directly on the cell you want to edit. To edit more than one record at the same time:
- Select the checkbox beside the records you want to update.
- To select all visible records, use the checkbox at the header of the table.
- Click the menu icon on the top right of the table.
- From the dropdown menu, select Edit records. A dialog box will open.
- Select the button beside the field you want to edit.
- Click Continue.
- Enter the new value in the text field.
- Click Change field to edit a different field.
- Click Cancel if you no longer want to edit it.
- Click Save when you're done. These changes cannot be undone.
Use Copilot to make changes
You can chat with Zapier Copilot to edit your table using AI. Zapier Copilot can also work with you across all other Zapier products to help you complete any changes in other assets.
To open Zapier Copilot, click the Copilot icon at the bottom of the left sidebar.
In the chat text field at the bottom left, enter the changes you want to make.
- Press Enter on your keyboard, or click the Send icon to send a message.
- (Optional) Click the microphone icon to use voice recognition to dictate your workflow.
- Click the Stop button in the chat field to stop the AI generation.
Copilot cannot delete fields, change the field type, or edit existing records.
Edit table settings
To edit the table's details, click the Settings icon on the left sidebar. In the Table Settings menu, you can perform the following actions:
- Name: change the table's name.
- Description: change the table's description.
- Send records: change how records are sent to Zaps - manually or automatically.
- Delete table: delete the table and its contents. This action cannot be undone.
Tables that are in use by a form cannot be deleted. To delete, first remove all table-related components from Zapier Forms. You can then delete your table.
Learn more about managing permissions in Zapier Tables and how to trigger and continue Zaps from records.
Data retention
Zapier's Data Retention, deletion, and export practices vary depending on the product. Learn more about the specific guidelines for the product you're using.
Provide feedback and get help
Submit a feature request, provide feedback on existing features, or get help from the Zapier Tables team. You can also discuss Tables with other users on Zapier's Early Access Program Slack.