You can use Storage by Zapier to preserve a small amount of data from one task for use later. This article includes examples of how to use Storage by Zapier for some common tasks.
Storage keys can be no longer than 32 characters, and Storage values can be no larger than 25000 bytes. If you need to be able to store more than this, it's best to use an external SQL app.
Example Use - Counting Triggers
It’s often beneficial to report on the number times a Zap ran during a given day or week. One can use Storage Increment Value to count the times a Zap ran and a Schedule trigger to send a daily report. This would require 2 Zap workflows to do:
Zap 1: Increment
You can attach a storage action to increment a value to any Zap that you wish to track:
Zap 2: Report
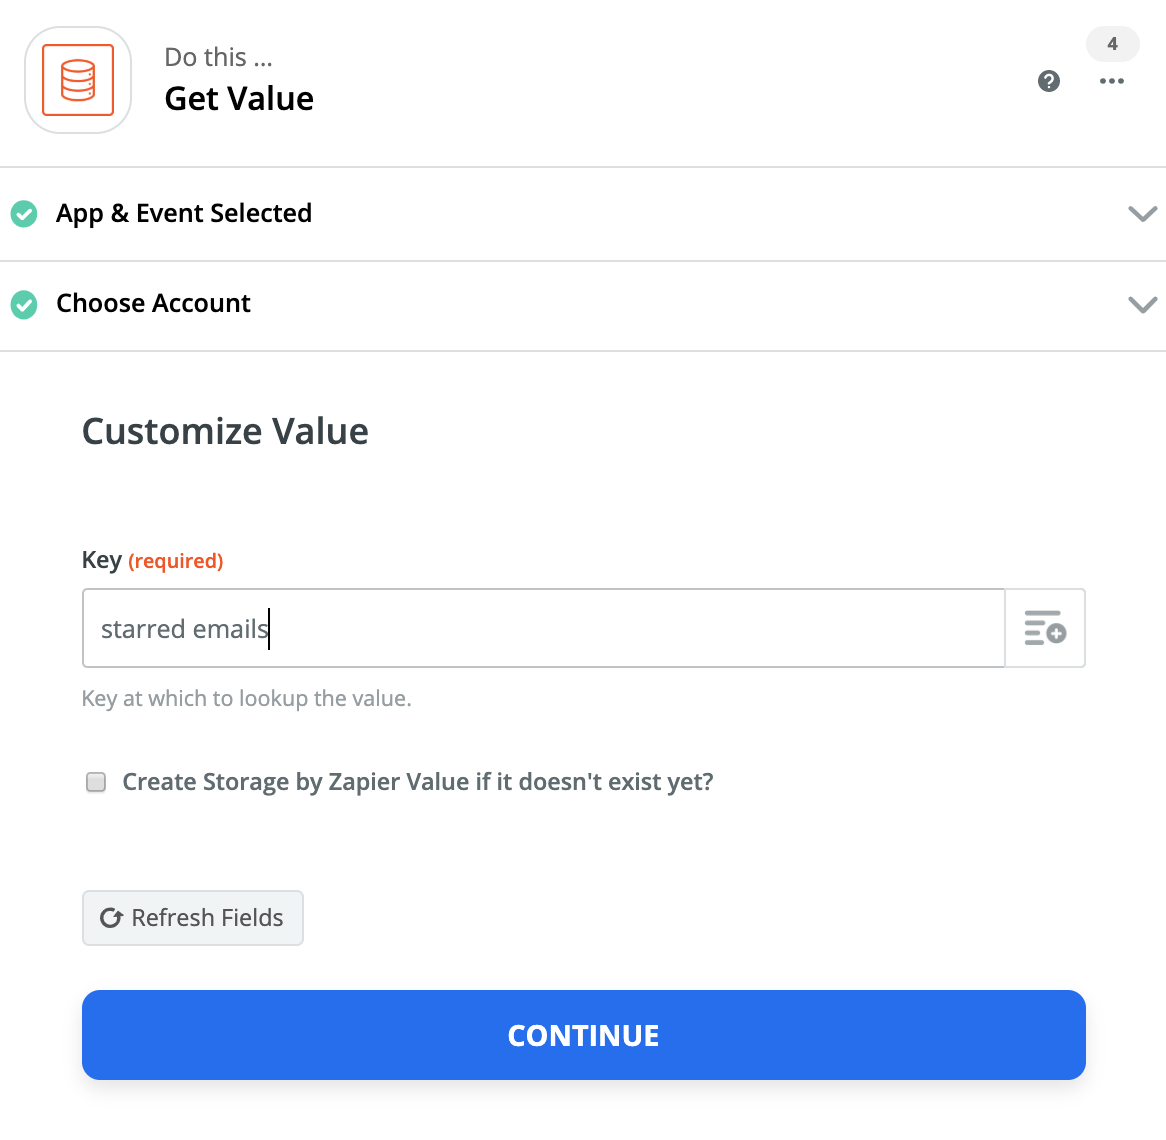
The Zap above will increment the value, now we need a step to pull this data out and to send along as a notification. You would need to set up a trigger to fire every day, the Schedule by Zapier app is perfect for this. Then you need to pull the value from Storage:
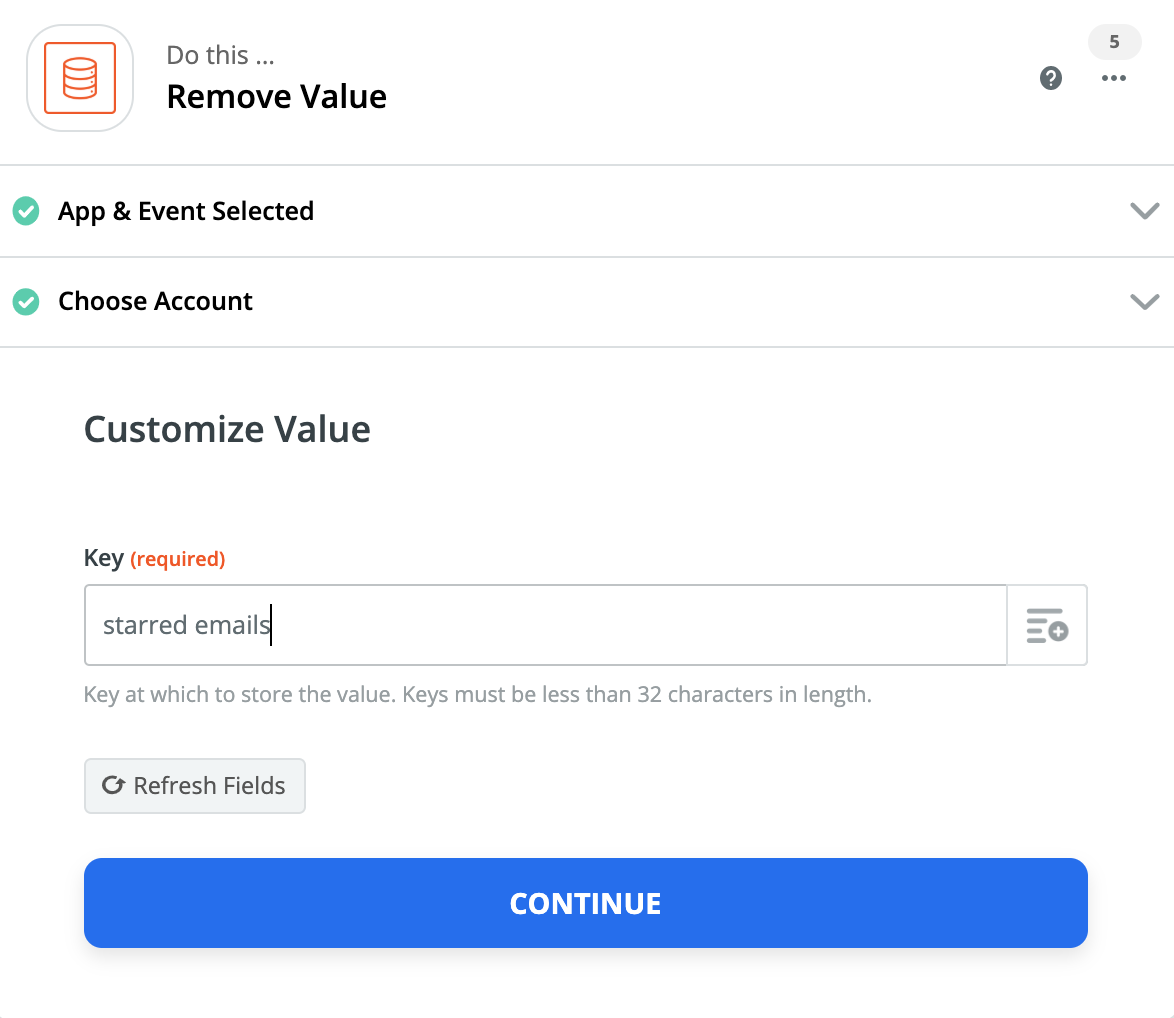
Next, you will wish to delete the value to reset this counter, so you can start a 0 the next day:
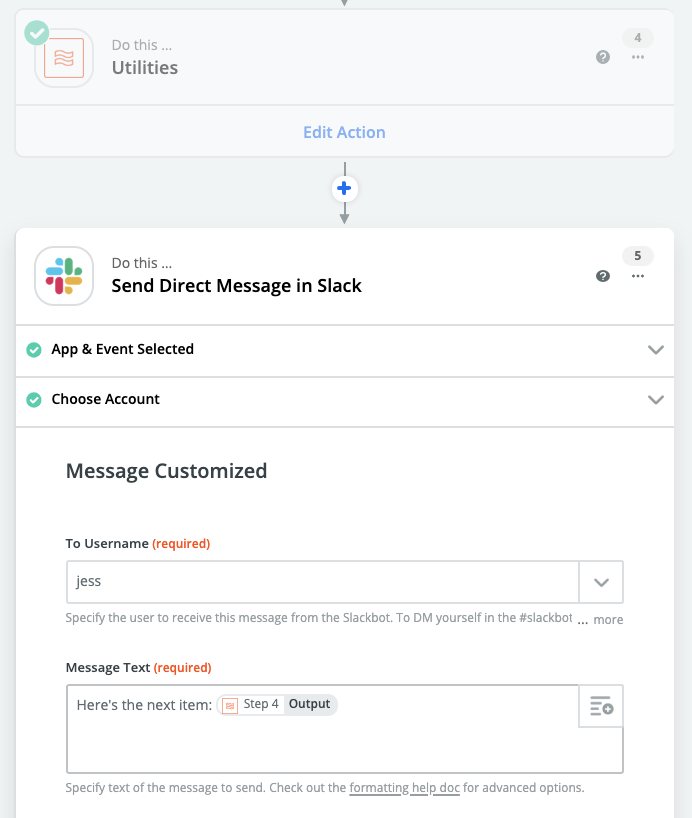
Finally, you can send the value that you pulled during the Pull Value step to whatever action that we support.
Example Use - Coupons
You can use Storage to send and keep track of the coupons that you send to customers. This would require 2 Zap workflows to do:
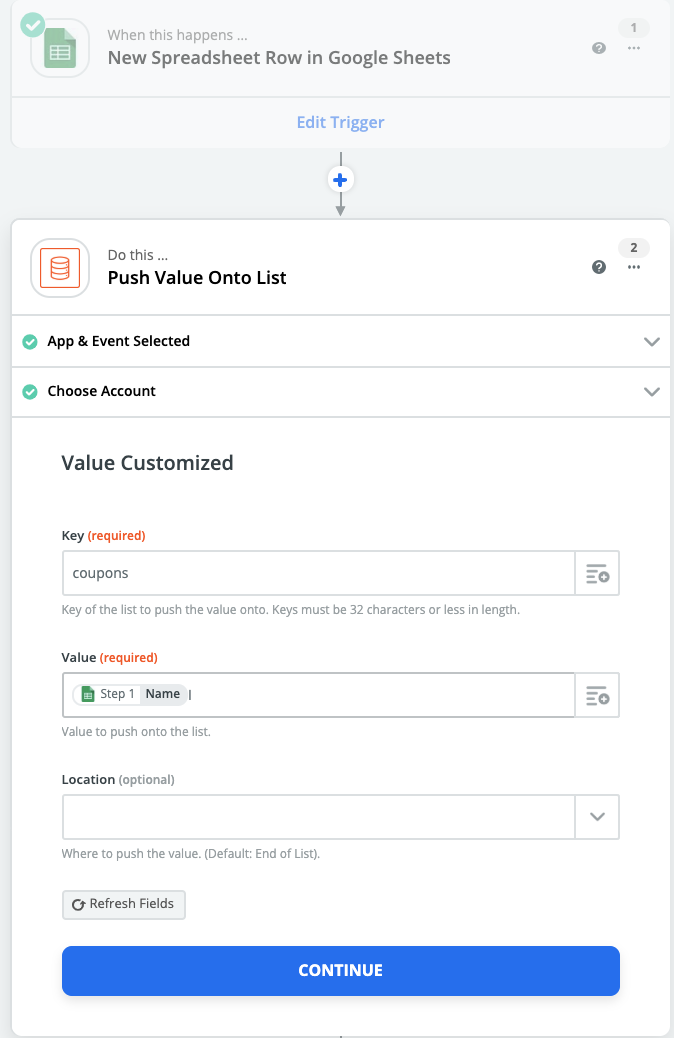
Zap 1: Add Coupon Codes to the Storage App
In this example, we are populating the Storage with coupon codes from a Google Sheet trigger that fires whenever a new row is added to the sheet:
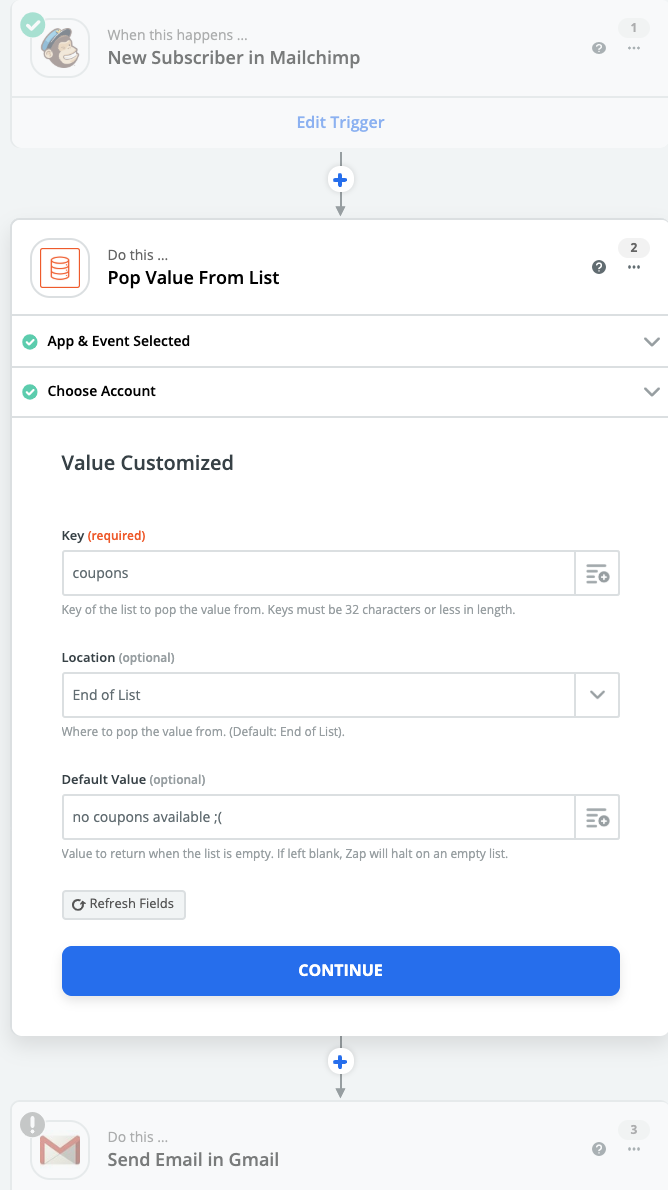
Zap 2: Pull Coupon Codes from Storage and Send Them to Customers
Now that we have our Storage loaded up with coupon codes to use, you can invoke storage as part of a second Zap that you use to deliver these codes one at a time. In this example, we are triggering off of a MailChimp New Subscriber, pulling the coupon from Storage, and then sending it to the customer in an email:
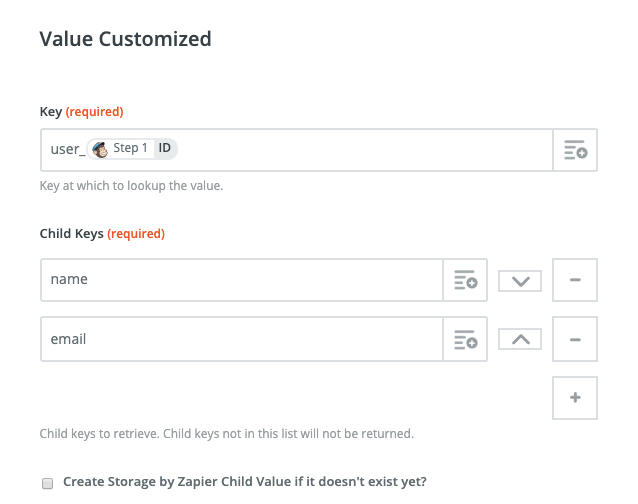
Example Use - Child Values
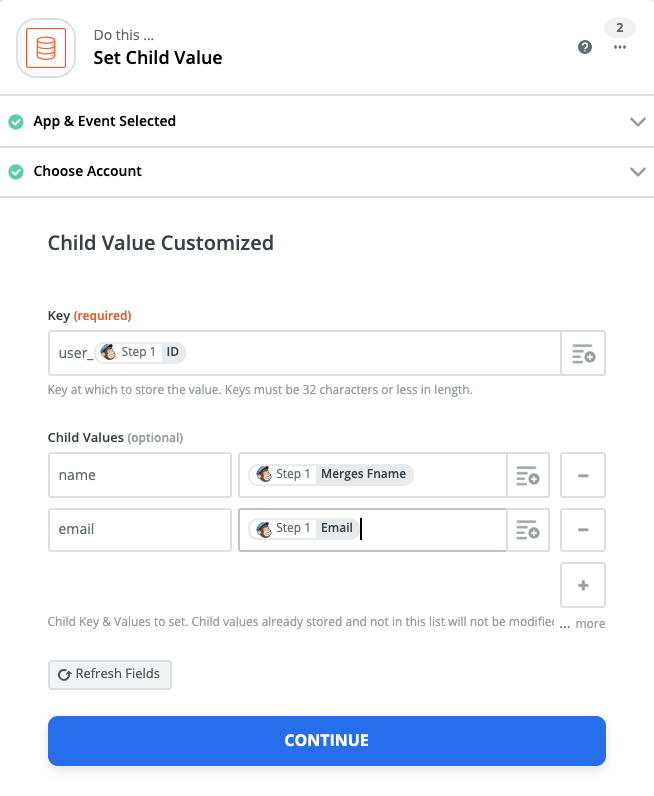
Storage by Zapier supports child values. Child values are nested values of data. This is useful if you want to be able to retrieve multiple related values at a time. Say, for instance, you’re storing information about “User_123”, including their name and email address. You could store this in a child value to be able to easily retrieve both the name and email address in one go.
To Set a Child Value, you would use the action of the same name in the Storage app:
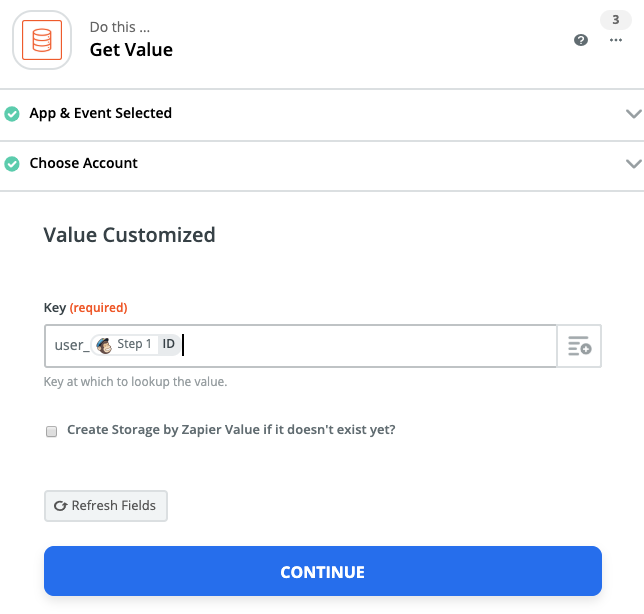
You can then either pull all the Child Values for a key using the Get Value search action:
Or you can pull a single value using the Get Child Values search action. In this case, we are pulling the email address for this value:
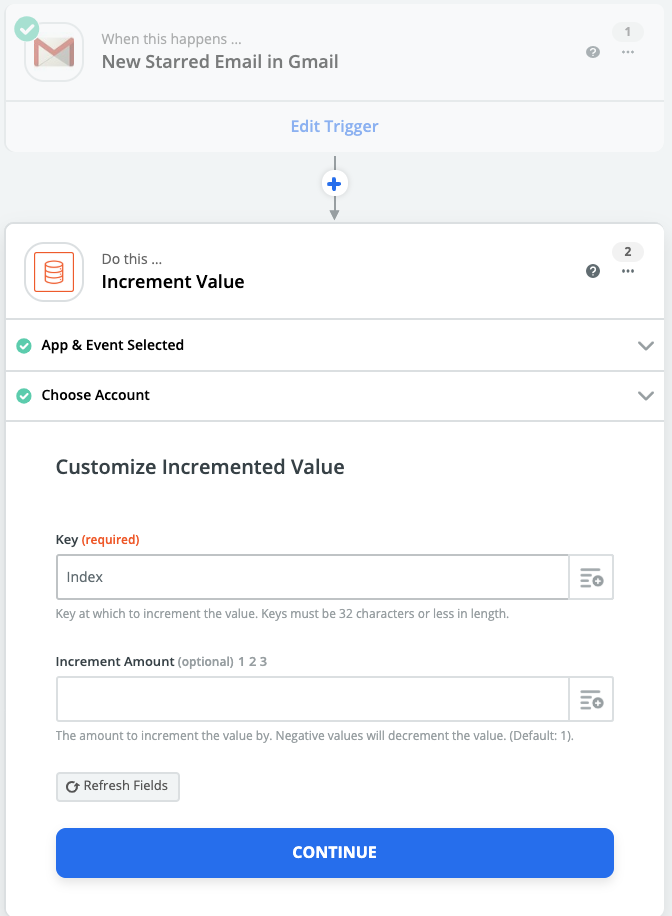
Example Use - Round Robin
Round Robin is a term used when you want to evenly distribute items to everyone in the group. This means that everyone will get a single "thing" before anyone gets a second "thing". This helps to evenly distribute actions over a group.
There are multiple ways to do this with Zapier. The easiest and most reliable method uses a combination of Storage by Zapier along with the Formatter by Zapier app.
This method relies on using a spreadsheet-like formula function in our Formatter tool: the Modulo function.
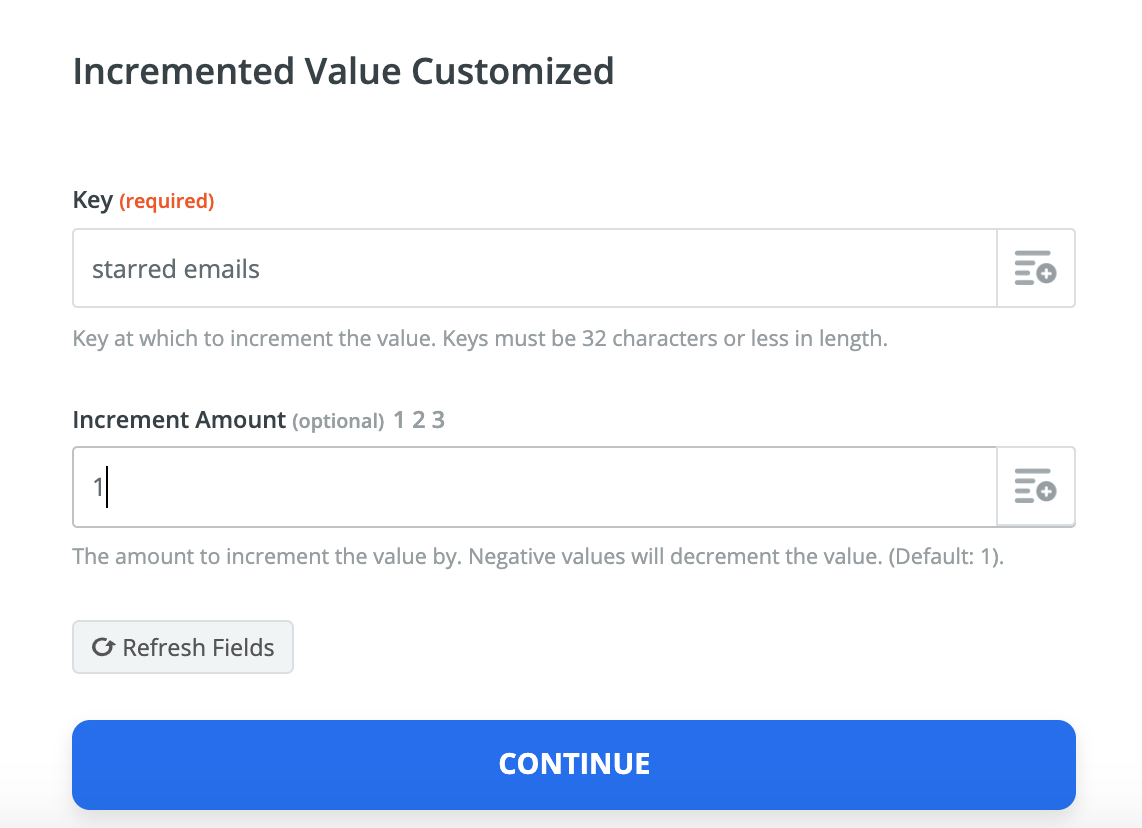
The first step would be to use the Increment Value action of Storage to set up a counter that we can increment every time this Zap runs:
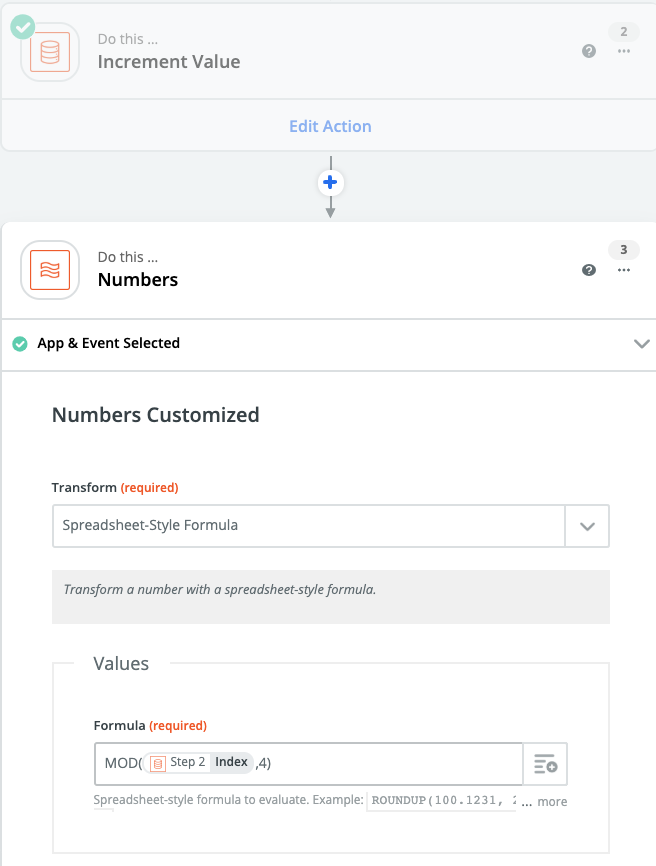
Next up, we would use the counter to perform the "modulo" of the number of items in the list. The number after the comma is however many items you want to round robin.
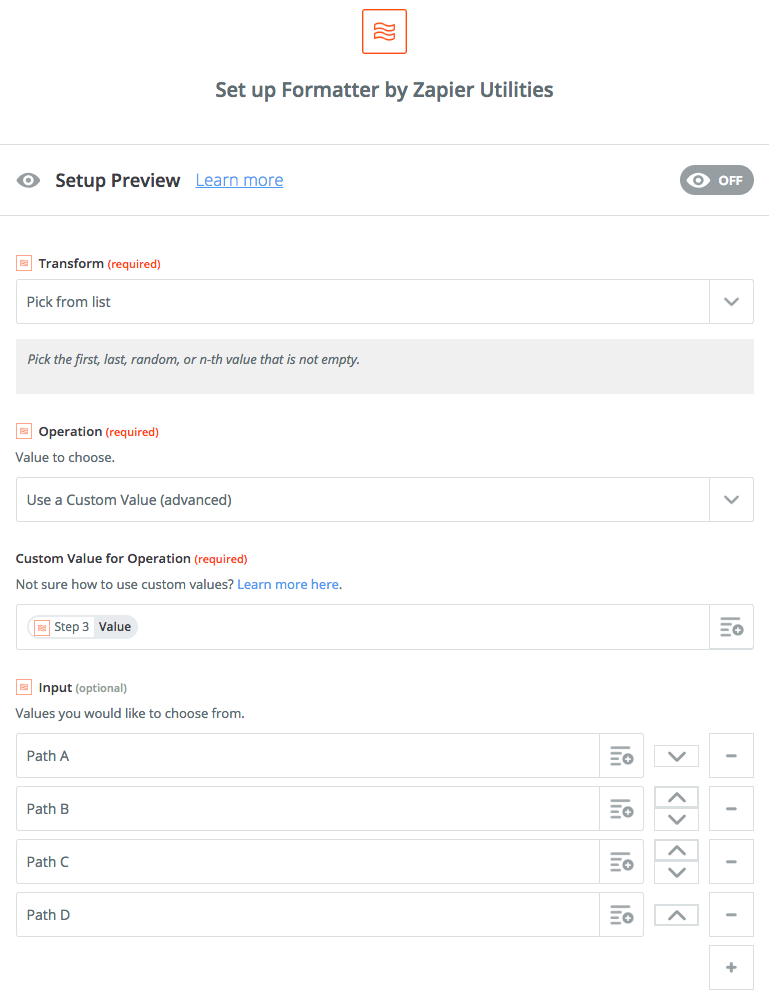
Using the Spreadsheet Formula, we can get which item to select. So, for a 4-item list, we would use this formula in the Formatter step:
Then, we use the modulo value for selecting which item in the list to select using the Formatter's "Pick from List" action. When the first number is 1, it outputs 1. When it's the same as the second number, it outputs 0.
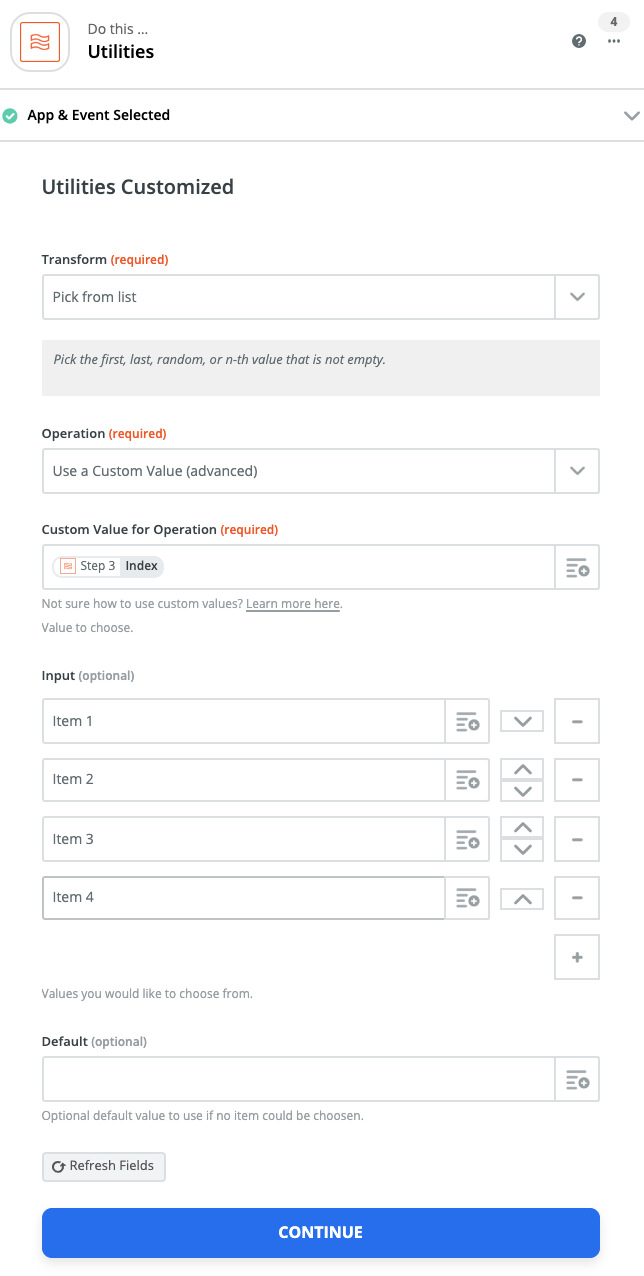
In Pick From List, the number 0 means the first option in the list. Because the modulo outputs 0, this works great!
Finally, we would then use the value that we picked from the last action:
Example Use - Round Robin with Paths
Paths are available for accounts on the Pro, Team and Enterprise plans. If you’re on a Free plan, you can try Paths for free for 7 days. Just add a Paths step to a Zap and you can start your free trial from the editor.
In the event that you want to take different actions entirely (or have an app like Google Sheets where custom values can't easily be used) you can use Paths. For the above example, you could set up one path per possible Formatter output, then add the action(s) you need within those Paths.
If we have 4 Paths, you could use Formatter's Pick from List function to output one of four paths:
Then set up one path for each of those possible outputs:
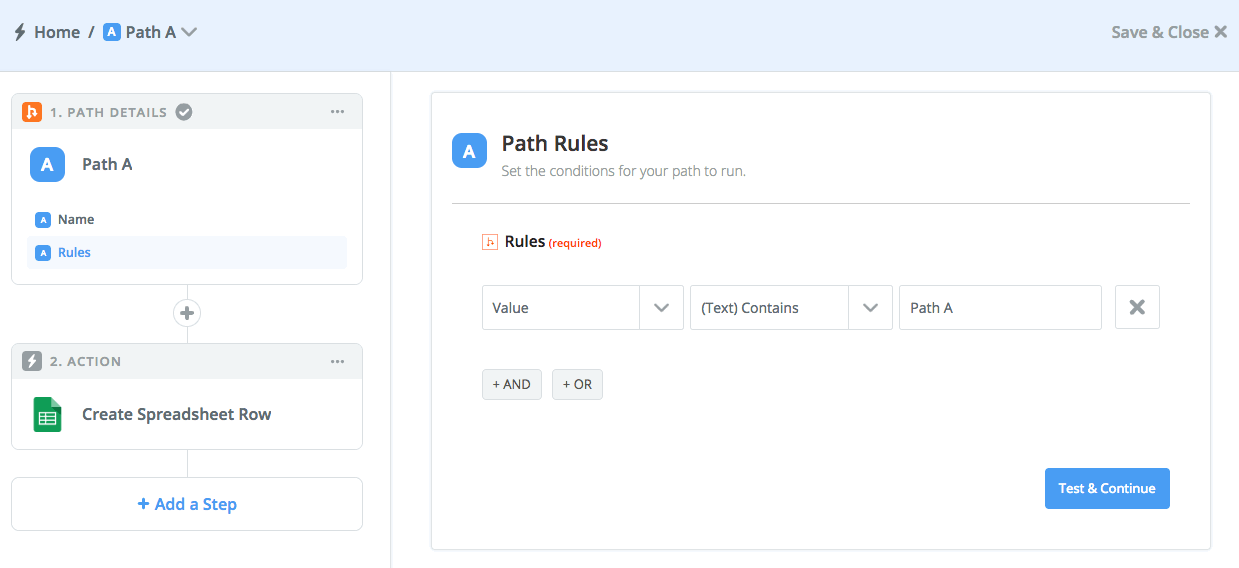
Example Use - Round-Robin with two Paths
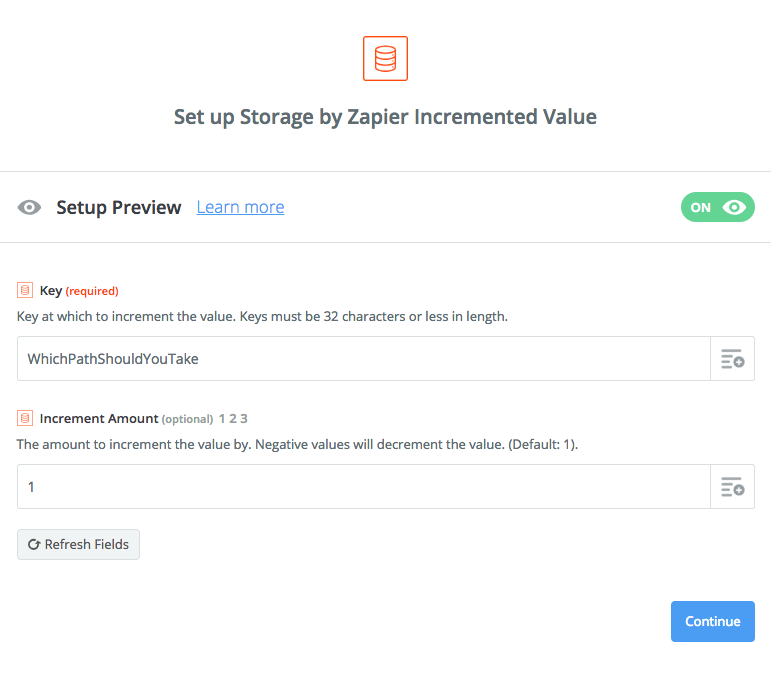
Here's an approach you can take if you're trying to do something like divvy up leads between 2 agents, offices, etc. Since you've only got 2 possible paths, we can use the Increment Value option in the Storage app followed by a Spreadsheet-Style Formula in the Formatter app to determine whether the value is even. If it is, output "Path A" and if it's not then output "Path B".
Storage — Increment Value
Formatter — Spreadsheet-Style Formula
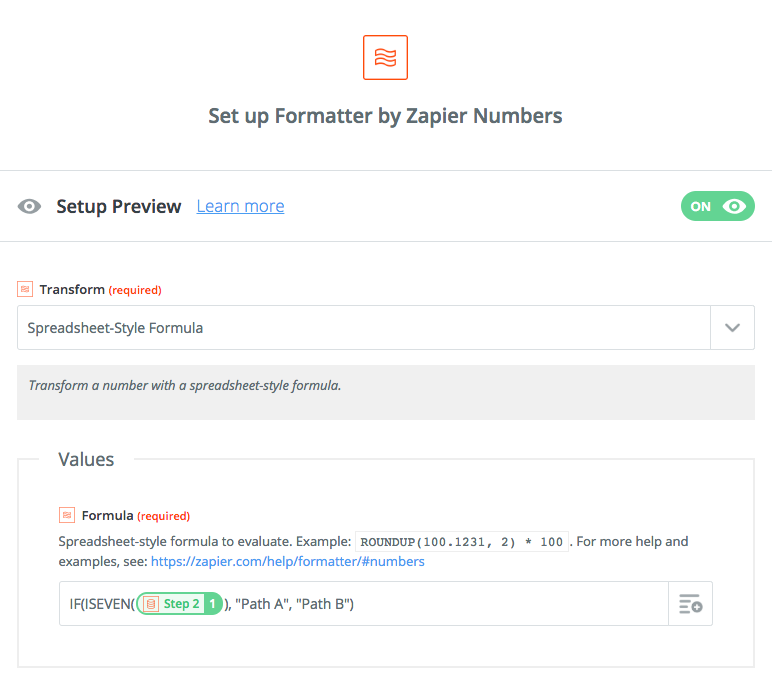
Which Path?
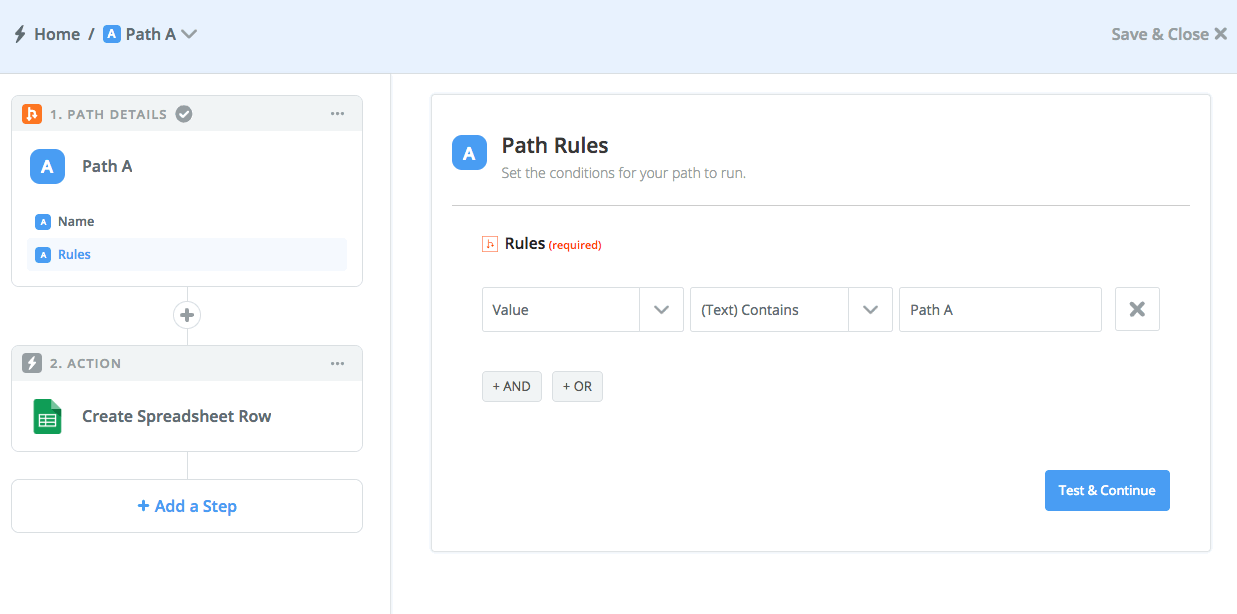
Much like the example above, you would add rules to your paths to only continue if the output of that Formatter step matches your condition. In this case, you would only need 2 paths: