The Assets page organizes all of your assets across all Zapier products–Zap workflows, Tables, Forms, Chatbots, Canvas, and Agents–in a single location. It allows you to view and organize assets in multi-product folders or by individual product.
Available on plans:
Free
Professional
Team
Enterprise
Accessing the Assets page
To go to the Assets page, click the assets icon in the left sidebar on any main Zapier page. Once there, there’s a second left-hand sidebar that you can use to navigate between folders and product-specific asset pages.
This new design is being rolled out to users in stages through the end of 2025. If you do not see this design, refer to specific product pages in the Help Center for more information on how to organize and manage your assets:
Folders
Folders let you organize related assets from all Zapier products in one location for better asset management.
You have a customer support workflow that uses several Zapier products:
- A chatbot where customers can ask questions.
- A table to store frequently asked questions from customers that the chatbot uses to send replies to customers.
- A Zap to notify your support team when a customer needs more help.
For easy management, you can organize all of them in a single folder.
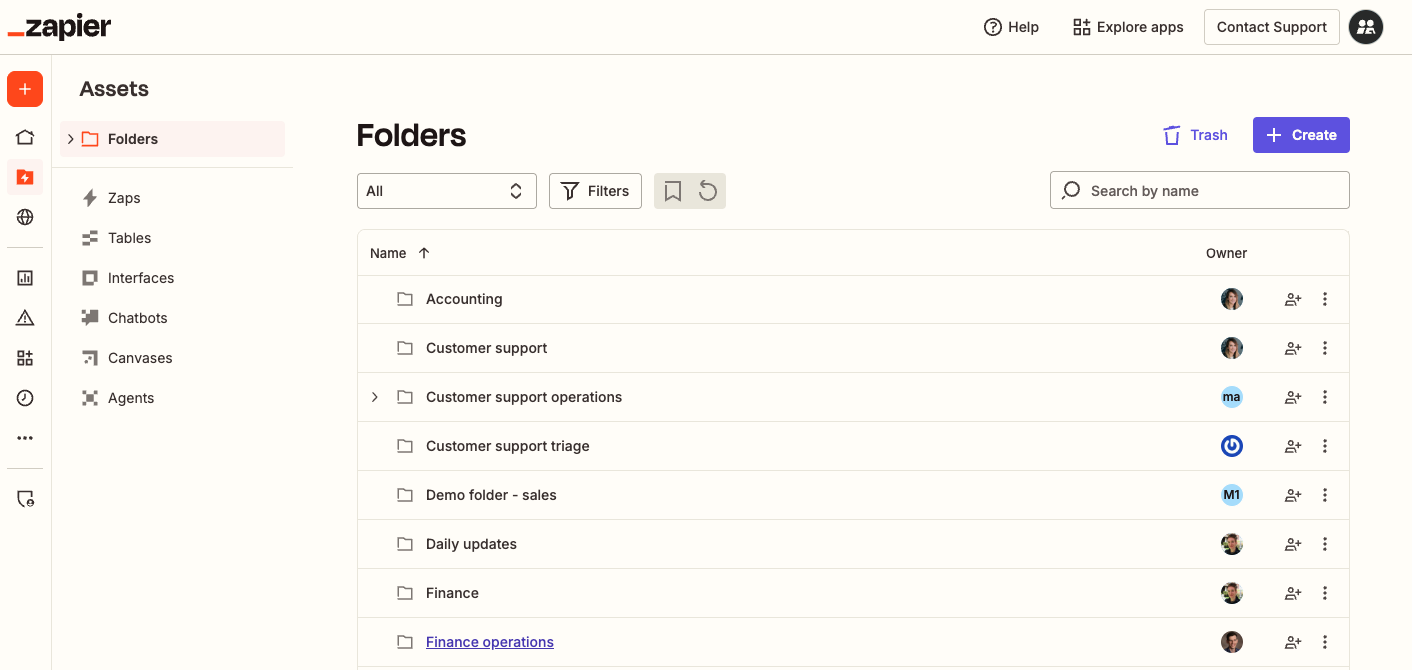
Folders list page
By default, when you navigate to the Assets page, it will open to the Folders list page, which contains all folders that you have access to:
- Your personal folder and any subfolders within it.
- Folders you own and shared with others.
- Folders that others own and have shared with you.
Account super admin and owners can access any folder or asset in an account, even if they are not shared with them. Learn more about account user roles and permissions.
Folder-specific pages
When you select a specific folder from the Folders list page, you will be redirected to that folder’s page. Each folder has a Documentation tab, where you can pin one canvas for quick access. The canvas must already be in the folder to be pinned. Learn how to pin a canvas to a folder’s documentation tab.
Top menu
The top level menu allows you to search for and filter folder results, as well as access the Trash folder and create new assets or folders.
- A search bar where you can search for a folder by name.
-
A dropdown menu where you can filter results by folder access:
- All: all folders you own or which have been shared with you.
- Owned by me: folders you own.
- Shared with me: folders that other users in your Team or Enterprise account own and have shared with you.
- A dropdown menu where you can filter results by owner.
- The Default view button . When clicked, it will save your current view, including any filter settings you've applied, as your default view in the future.
-
The Reset view button . When clicked, it will remove the filter settings you've previously saved. By default, Zapier displays all folders that you own or have access to.
-
The + Create button. When you click it, a dropdown menu will expand with options to create a new asset or folder.
Folders list
Folders are displayed in a table-style list. Each row in the list represents a single folder and includes:
- Name: the name of the folder. You can sort alphabetically by clicking this column (A to Z or Z to A).
- Owner: The folder owner’s avatar.
- Share folder button: lets you share the folder with others in your account. Learn more about sharing folders.
- Menu icon : opens more management options. Learn more about managing folders.
If a folder has subfolders, it will display a right arrow icon that you can click to reveal them.
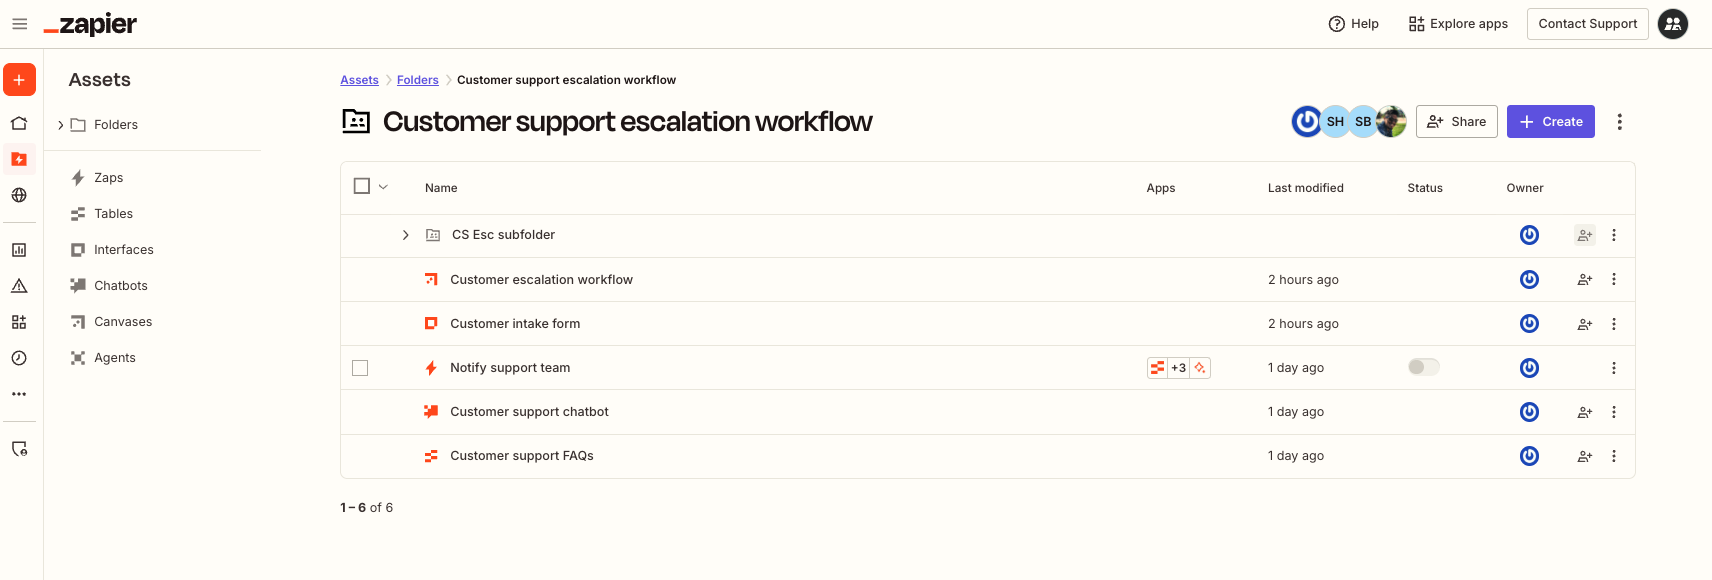
Folder-specific pages
When you select a specific folder from the Folders list page, you will be redirected to that folder’s page.
Top menu
The top level menu allows you to manage the folder. It displays:
- Avatars of members with whom the folder is currently shared.
- The Share button. Learn more about sharing folders.
- The + Create button. When you click it, a dropdown menu will expand with options to create a new asset or folder.
- A menu icon that opens more management options. Learn more about managing folders.
Asset list
It will display all assets stored in that folder, displayed as a table-style list. Each row in the list represents a single asset and includes:
- Name: the name of the asset.
- Apps: if the asset is a Zap, icons for apps used in the Zap.
- Last modified: a timestamp that displays when the asset was last changed.
- Status: if the asset is a Zap, a toggle switch that indicates whether it is turned on or off.
- Owner: the asset owner’s avatar.
- Share folder button: lets you share the folder with others in your account. Learn more about sharing folders.
- Menu icon : opens more management options. Learn more about managing folders.
If a folder has subfolders, they will also be displayed in the asset list. If subfolders are nested within a subfolder, they will display a right arrow icon that you can click to reveal them.
Zap workflows can only be shared individually from within the Zap editor or by sharing the folder they are in. They will not display the Share button.
Product-specific asset pages
Each Zapier product has its own product-specific asset page that includes a list of all assets that you have access to. To access it:
- Click the assets icon in the left sidebar on any main Zapier page. You will be redirected to a new page.
-
In the second left-hand sidebar, select the product you want to access. You will be redirected to a new page where you will see all:
- Assets you own.
- Assets others own and have shared with you.
- Account super admin and owners can access any folder or asset in an account, even if they are not shared with them. Learn more about account user roles and permissions.
- Agents does not have a product-specific asset page. When you select it from the second left-hand sidebar, you will be redirected to the main Agents page.
Top menu
The top level menu allows you to manage the folder. It displays different options depending on the product.
Zap workflows
In the Zap workflows-specific product page, the top level menu allows you to manage your Zap workflows. It displays:
- A search bar where you can search for a Zap by name or a webhook URL used in a Webhooks step in the Zap.
- A dropdown menu where you can filter results by Zap access: - All: all Zap workflows you own or which have been shared with you. - Owned by me: Zap workflows you own. - Shared with me: Zap workflows that other users in your Team or Enterprise account own and have shared with you. - Pending billing: any Zap workflows that are turned off due to billing issues.
- A Filters button that provides additional filtering options by: - Owner: the owner of the Zap. - Status: whether the Zap is on or off. - App: an app used in the Zap. - Connection: an app connection used in the Zap.
- A dropdown menu where you can filter results by owner.
- The Default view button . When clicked, it will save your current view, including any filter settings you've applied, as your default view in the future.
-
The Reset view button . When clicked, it will remove the filter settings you've previously saved. By default, Zapier displays all folders that you own or have access to.
-
The Trash button. When you click Trash, you will be redirected to the Trash folder.
- The + Create button. When you click it, a dropdown menu will expand with options to create a new Zap or folder.
Tables
In the Tables-specific product page, the top level menu allows you to manage your tables. It displays:
- A search bar where you can search for a table by name.
- A dropdown menu where you can filter results by table access: - All: all tables you own or which have been shared with you. - Owned by me: tables you own. - Shared with me: tables that other users in your Team or Enterprise account own and have shared with you.
- A dropdown menu where you can filter results by owner.
- A User guide button. When you click it, you’ll be redirected to Tables’ user guide.
- An Import data button. When you click it, you’ll be redirected to a new page to import your data to create a table.
- The + Create button. When you click it, you’ll be redirected to a new page where you can create a table.
Forms
In the Forms-specific product page, the top level menu allows you to manage your form projects. It displays:
- A search bar where you can search for an form project by name.
- A dropdown menu where you can filter results by form project access: - All: all form projects you own or which have been shared with you. - Owned by me: form projects you own. - Shared with me: form projects that other users in your Team or Enterprise account own and have shared with you.
- A dropdown menu where you can filter results by owner.
- A Help button. When you click it, you’ll be redirected to Forms’ help portal.
- The + Create button. When you click it, you’ll be redirected to a new page where you can create a form project.
Chatbots
In the Chatbots-specific product page, the top level menu allows you to manage your chatbots. It displays:
- A search bar where you can search for a chatbot by name.
- A dropdown menu where you can filter results by chatbot access: - All: all chatbots you own or which have been shared with you. - Owned by me: chatbots you own. - Shared with me: chatbots that other users in your Team or Enterprise account own and have shared with you.
- A dropdown menu where you can filter results by owner.
- The + Create button. When you click it, you’ll be redirected to a new page where you can create a chatbot.
Canvases
In the Canvases-specific product page, the top level menu allows you to manage your canvases. It displays:
- A copilot section to help you build new canvases.
- A search bar where you can search for a canvas by name.
- A dropdown menu where you can filter results by canvas access: - All: all canvases you own or which have been shared with you. - Owned by me: canvases you own. - Shared with me: canvases that other users in your Team or Enterprise account own and have shared with you.
- A dropdown menu where you can filter results by owner.
- The + Create button. When you click it, you’ll be redirected to a new page where you can create a canvas.
Asset list
Assets are displayed in a table-style list. Each row in the list represents a single asset and displays different options depending on the product.
Zap workflows
In the Zap workflows-specific product page, the Zap workflows list allows you to see each individual Zap. Each row in the list displays:
- Name: The name of the Zap. You can sort alphabetically by clicking this column (A to Z or Z to A).
- Apps: icons for apps used in the Zap.
- Location: a link to the folder the Zap is in.
- Last modified: a timestamp that displays when the Zap was last changed. You can sort chronologically by clicking this column (newest to oldest or oldest to newest).
- Status: a toggle switch that indicates whether the Zap is turned on or off. You can sort by clicking this column (in order of on to off or off to on)
- Owner: the Zap owner’s avatar.
- Menu icon : opens more management options.
Zap workflows can only be shared individually from within the Zap editor or by sharing the folder they are in. They will not display the Share asset button.
Tables
In the Tables-specific product page, the Tables list allows you to see each individual table. Each row in the list displays:
- Name: The name of the table. You can sort alphabetically by clicking this column (A to Z or Z to A).
- Location: if the table is in a folder, a link to the folder.
- Last modified: a timestamp that displays when the table was last changed. You can sort chronologically by clicking this column (newest to oldest or oldest to newest).
- Owner: the table owner’s avatar.
- Share button: lets you share the table with others in your account. Learn more about sharing tables.
- Menu icon : opens more management options. Learn more about managing tables.
Forms
In the Forms-specific product page, the Forms list allows you to see each individual form project. Each row in the list displays:
- Name: The name of the form project. You can sort alphabetically by clicking this column (A to Z or Z to A).
- Location: if the form project is in a folder, a link to the folder.
- Last modified: a timestamp that displays when the form project was last changed. You can sort chronologically by clicking this column (newest to oldest or oldest to newest).
- Owner: the form project owner’s avatar.
- Share button: lets you share the form project with others in your account. Learn more about sharing form projects.
- Menu icon : opens more management options. Learn more about managing form projects.
Chatbots
In the Chatbots-specific product page, the Chatbots list allows you to see each individual chatbot. Each row in the list displays:
- Name: The name of the chatbot. You can sort alphabetically by clicking this column (A to Z or Z to A).
- Model: The AI model used by the chatbot.
- Location: if the chatbot is in a folder, a link to the folder.
- Last modified: a timestamp that displays when the chatbot was last changed. You can sort chronologically by clicking this column (newest to oldest or oldest to newest).
- Owner: the chatbot owner’s avatar.
- Share button: lets you share the chatbot with others in your account. Learn more about sharing chatbots.
- Menu icon : opens more management options. Learn more about managing chatbots.
Canvases
In the Canvases-specific product page, the Canvases list allows you to see each individual canvas. Each row in the list displays:
- Name: The name of the canvas. You can sort alphabetically by clicking this column (A to Z or Z to A).
- Location: if the canvas is in a folder, a link to the folder.
- Last modified: a timestamp that displays when the canvas was last changed. You can sort chronologically by clicking this column (newest to oldest or oldest to newest).
- Owner: the canvas owner’s avatar.
- Share button: lets you share the canvas with others in your account. Learn more about sharing assets.
- Menu icon : opens more management options. Learn more about managing assets.
Learn more about managing assets and folders.